It's Friday, that means it's Ringo Lake time! Clue 2 of "On Ringo Lake" is up - this week is Flying Geese Units. A BUNCH of Flying Geese Units in our 'coral to melon' family of colors with neutral.
Bonnie gives us three different techniques to make the units, and I know a couple more besides traditional patchwork. So I thought I'd try all the techniques and see which one I like best.
I'm going to make some of the geese with the same 'sky' on both sides (due to the technique) and some will be scrappy. I think as long as I scatter them around, either way will work.
First up:
Stitch and Flip. I'm very familiar with this technique. It's how I did the star points on my Scrappy Sister's Choice (which is getting closer to being bound, btw).
With this technique, you cut a rectangle and two squares, mark a diagonal line on the squares, place them on the rectangle and use the drawn line as a stitching guide. Then you trim off the excess and 'flip' the wing unit into place. Bonnie gives some great tips on how to perfect this!
Pros: Familiar. No specialty ruler needed - just a standard 6 inch rotary ruler or similar. Easy to have each side of the sky either match or be different. Quick if you just need a few units. Possibility for bonus half square triangle units if you do another seam line and cut between them.
Cons: Takes time (and slows production down) to mark the line. Because you 'flip', it's important to be sure that the sewing line is just 'outside' the marked line. Can't use a stitching guide on the bed of your machine since you aren't sewing along an actual edge seam.
Second 'skein' (of geese, not yarn - the last step looks like the leader of geese in flight):
"no waste" (second technique on this tutorial from Connecting Threads).
Big square, four little squares, premarked lines.
Pros: As advertised, no waste. No specialty ruler needed - just a standard 6 inch rotary ruler or similar. But you do need an accurate scant 1/4 inch foot on your machine. Easy to have each side of the sky either match or be different.
Cons: Takes time (and slows production down) to mark the line. Because you 'flip', it's important to be sure that the sewing line is just 'outside' the marked line. Can't use a stitching guide on the bed of your machine since you aren't sewing along an actual edge seam. Quilt math (though handy charts exist). Because you add 7/8 inch to the height, you can't use pre-cut squares (which are 2.5 inches). There are dog ears to trim.
Third 'flock' (Geese on the ground because they are not all in a row.):
Oversized method by Eleanor Burns at Quilt in a Day. I learned this technique years ago, (Instructions from QiaD).
Big Square, Little Square, marked lines. Be careful with pressing and cutting, it's easy to go wrong and cut where you don't intend to (don't ask! or look in the crumbs bin). But if you do it right, it's really slick.
I really do like this technique for the most accurate geese units I've ever done without using foundation paper piecing. I do have an occasional 'glitch' where one of the corners doesn't hit quite right when I trim. I think that may be due to my seam allowance being a bit 'scant' - you want a true quarter inch for these.
You do not need the QiaD specialty ruler if you have a square with diagonals, but the goose ruler helps make the trimming go much faster. (I don't and just use a Creative Grids square.)
Pros: Accurate - since these are made oversized and trimmed down.
Cons: Marked lines (again). As noted above, that slows the process down. Trimming does have more waste than the above two techniques, but not terrible. Not scrap friendly, as the original squares are fairly sizeable. "Sky" is identical on both sides of the unit and no way to change that.
Cons: Specialty ruler required. That being said, I do like this ruler - the lines are narrower than some and I really appreciate that as some rulers (omnigrid, I'm looking at you) have lines so thick that you can't really tell where you are cutting. Corner triangle waste. The bias edges are 'live', so you need to be careful moving the units from the cutting mat to the sewing machine as you don't want your nice accurate edge to move.
Sixth 'team':
Bonnie's Essential Triangle Tool. Precut 'geese' and paired 'sky' triangles.
Pros: Everything is cut from standard sized strips. No waste. Once the prep is done, you can chain piece.
Cons: Specialty ruler, and rather awkward cutting angles, but I got faster as I went. Bias edges are 'live' when you match up the seams, so you need to be careful not to stretch them.
Conclusion:
I got good results from all the techniques. Each has a time and place that it would be best to use. Now, having done a dozen or so from each technique - the top choice is Simple Folded Corner Ruler for speed and accuracy.
There are more geese to do..... A LOT more geese to do.
UPDATES:
Saturday - the 'how many ways can I make a goose' experiment was successful, I have a bunch of dead geese (failures), but many more live geese (successes). I'm going to take a page from Bonnie's book and leave the failures in the crumbs bin and use them somewhere. The only thing wrong with most of them is that they are just a tad undersized. In a 'wonky star' or similar block, that won't matter at all.
Sunday - a quarter of the way finished with the goose count. I am not really trying to keep up. Work is crazy (and I need to go into work in a bit); plus there are Holiday parties and church activities. I do want to do a substantial number of each clue, enough to be able to finish on my own.
Tuesday - half way done.
I'm participating in the weekly link party for "On Ringo Lake" at Bonnie's blog.
#quiltvillemystery
#onringolakequilt
Bonnie gives us three different techniques to make the units, and I know a couple more besides traditional patchwork. So I thought I'd try all the techniques and see which one I like best.
Trivia:
The collective noun for a group of geese on the ground is a gaggle;
when in flight, they are called a skein, a team, or a wedge;
when flying close together, they are called a plump.
https://en.wikipedia.org/wiki/Goose
I'm going to make some of the geese with the same 'sky' on both sides (due to the technique) and some will be scrappy. I think as long as I scatter them around, either way will work.
First up:
Stitch and Flip. I'm very familiar with this technique. It's how I did the star points on my Scrappy Sister's Choice (which is getting closer to being bound, btw).
With this technique, you cut a rectangle and two squares, mark a diagonal line on the squares, place them on the rectangle and use the drawn line as a stitching guide. Then you trim off the excess and 'flip' the wing unit into place. Bonnie gives some great tips on how to perfect this!
Pros: Familiar. No specialty ruler needed - just a standard 6 inch rotary ruler or similar. Easy to have each side of the sky either match or be different. Quick if you just need a few units. Possibility for bonus half square triangle units if you do another seam line and cut between them.
Cons: Takes time (and slows production down) to mark the line. Because you 'flip', it's important to be sure that the sewing line is just 'outside' the marked line. Can't use a stitching guide on the bed of your machine since you aren't sewing along an actual edge seam.
 |
| Stitch and Flip |
Second 'skein' (of geese, not yarn - the last step looks like the leader of geese in flight):
"no waste" (second technique on this tutorial from Connecting Threads).
Big square, four little squares, premarked lines.
Pros: As advertised, no waste. No specialty ruler needed - just a standard 6 inch rotary ruler or similar. But you do need an accurate scant 1/4 inch foot on your machine. Easy to have each side of the sky either match or be different.
Cons: Takes time (and slows production down) to mark the line. Because you 'flip', it's important to be sure that the sewing line is just 'outside' the marked line. Can't use a stitching guide on the bed of your machine since you aren't sewing along an actual edge seam. Quilt math (though handy charts exist). Because you add 7/8 inch to the height, you can't use pre-cut squares (which are 2.5 inches). There are dog ears to trim.
 |
| No waste - step one in back, step two in front |
Third 'flock' (Geese on the ground because they are not all in a row.):
Oversized method by Eleanor Burns at Quilt in a Day. I learned this technique years ago, (Instructions from QiaD).
Big Square, Little Square, marked lines. Be careful with pressing and cutting, it's easy to go wrong and cut where you don't intend to (don't ask! or look in the crumbs bin). But if you do it right, it's really slick.
I really do like this technique for the most accurate geese units I've ever done without using foundation paper piecing. I do have an occasional 'glitch' where one of the corners doesn't hit quite right when I trim. I think that may be due to my seam allowance being a bit 'scant' - you want a true quarter inch for these.
You do not need the QiaD specialty ruler if you have a square with diagonals, but the goose ruler helps make the trimming go much faster. (I don't and just use a Creative Grids square.)
Pros: Accurate - since these are made oversized and trimmed down.
Cons: Marked lines (again). As noted above, that slows the process down. Trimming does have more waste than the above two techniques, but not terrible. Not scrap friendly, as the original squares are fairly sizeable. "Sky" is identical on both sides of the unit and no way to change that.
 |
| Quilt in a Day geese - before trimming |
Fourth 'wedge':
Foundation Piecing. I will say up front that I've done very little foundation piecing, though it's something that I have long had on my 'to learn' list. But I know there are people who swear by it. So I grabbed some graph paper and drafted some singleton goose units.
Pros: Accurate, very accurate. Trimming is also Very Fast, as there's an exact line to trim on. Scrap friendly and easy to do two different fabrics on the 'sky'.
Cons. I struggled with seam allowances until I found the tip about pressing, folding back the paper along the seam line and then trimming. You do need a copier because hand drafting every block just to destroy it is SLOW.
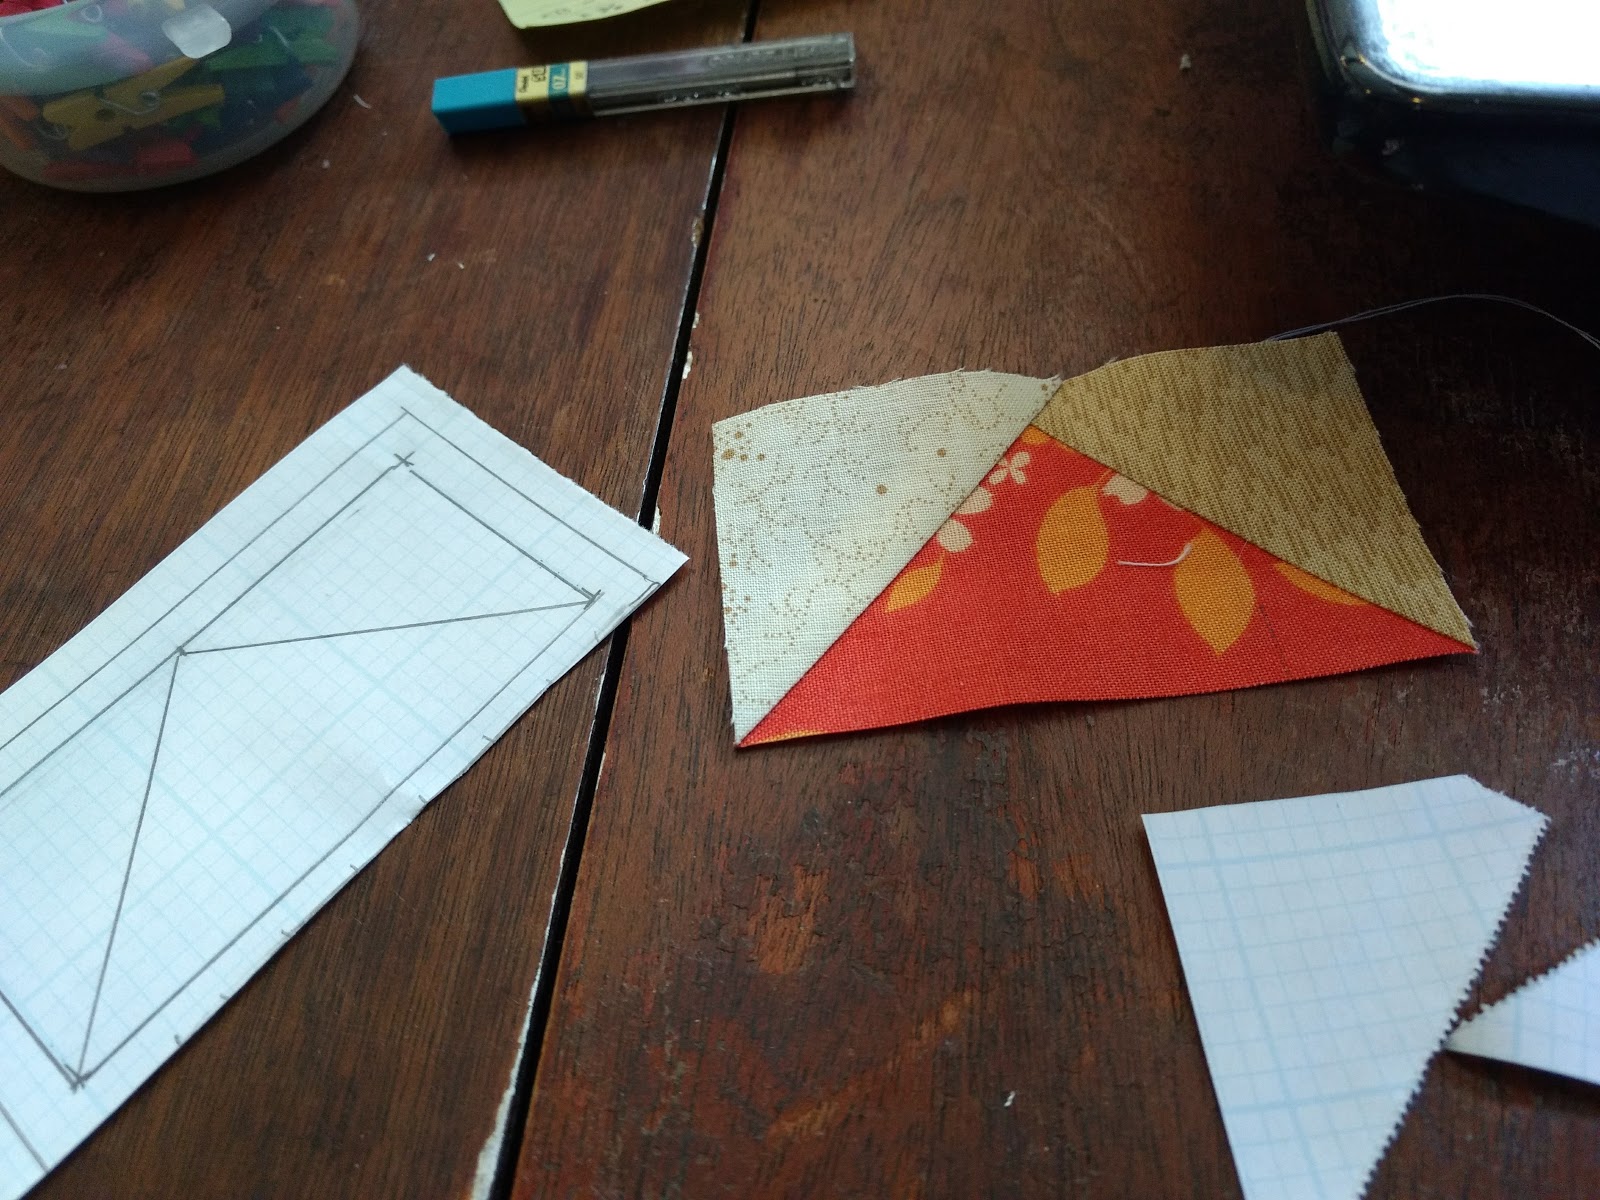 |
| Foundation Piecing on hand drafted paper templates |
Fifth 'gaggle':
Simple Folded Corners Ruler method in Bonnie's clue. Basically this technique takes the stitch and flip method and eliminates the need to mark the line by providing a perfect angle so they can be cut in advance.
Pros: Faster than the methods that require marking. Opportunity for bonus corner half square triangles. Because you are stitching on a seam edge, seam guide can be used (and should be, you need an accurate 'scant' quarter inch for the ruler to work properly.) VERY little trimming if you are precise with your seam; I only needed it to trim off thread tails and the occasional fray.
Pros: Faster than the methods that require marking. Opportunity for bonus corner half square triangles. Because you are stitching on a seam edge, seam guide can be used (and should be, you need an accurate 'scant' quarter inch for the ruler to work properly.) VERY little trimming if you are precise with your seam; I only needed it to trim off thread tails and the occasional fray.
Cons: Specialty ruler required. That being said, I do like this ruler - the lines are narrower than some and I really appreciate that as some rulers (omnigrid, I'm looking at you) have lines so thick that you can't really tell where you are cutting. Corner triangle waste. The bias edges are 'live', so you need to be careful moving the units from the cutting mat to the sewing machine as you don't want your nice accurate edge to move.
 |
| Simple Folded Corners Ruler |
Sixth 'team':
Bonnie's Essential Triangle Tool. Precut 'geese' and paired 'sky' triangles.
Pros: Everything is cut from standard sized strips. No waste. Once the prep is done, you can chain piece.
Cons: Specialty ruler, and rather awkward cutting angles, but I got faster as I went. Bias edges are 'live' when you match up the seams, so you need to be careful not to stretch them.
 |
| Cut with the Essential Triangle Tool - ready to sew |
Conclusion:
I got good results from all the techniques. Each has a time and place that it would be best to use. Now, having done a dozen or so from each technique - the top choice is Simple Folded Corner Ruler for speed and accuracy.
There are more geese to do..... A LOT more geese to do.
UPDATES:
Saturday - the 'how many ways can I make a goose' experiment was successful, I have a bunch of dead geese (failures), but many more live geese (successes). I'm going to take a page from Bonnie's book and leave the failures in the crumbs bin and use them somewhere. The only thing wrong with most of them is that they are just a tad undersized. In a 'wonky star' or similar block, that won't matter at all.
Sunday - a quarter of the way finished with the goose count. I am not really trying to keep up. Work is crazy (and I need to go into work in a bit); plus there are Holiday parties and church activities. I do want to do a substantial number of each clue, enough to be able to finish on my own.
 |
| Geese in Flight...... |
 |
| Some clue one and two units laid out together |
I'm participating in the weekly link party for "On Ringo Lake" at Bonnie's blog.
#quiltvillemystery
#onringolakequilt
Your geese looks great!. I enjoyed making geese with the Simple Folded Corner ruler. Except for cutting strips, I used the ruler for everything,rectangels, squares, the geese wiwngs and triming.I think it is a great ruler.
ReplyDeleteThank you, aren't they fun! I am using each clue to learn new techniques and refine my piecing. I love learning new quilting tricks.
DeleteBeautiful Geese!I forgot I had Bonnie's new ruler! the triangle one...I'll use it next time. This time I used Easy Angle & Companion. Love them.
ReplyDeleteIt's really nifty and I enjoyed trying that technique. My only issue is that half the cuts are at an angle that seems to aggravate an old shoulder injury. So the ruler that lets me cut at my 'optimal' angle won the "how many ways can I goose" contest.
Delete