Showing posts with label UFO. Show all posts

Sunday, January 31, 2021

Slow Sunday Stitching - January 31, 2021

 Rainy the last couple of days here in Kansas and it's cold and cloudy today.  It was a great weekend to hibernate craft, so that is all I did!

I'm at about three hours into Dutch Beauty this rotation round.   Working on page P/16.  I've put in the three small motifs (squirrel, plant and basket) between the lily vase on page O/15 and the big vase of flowers that flank the main center motif on the bottom row.   I'm now working on the bottom border for this page before I start on the vase of fritterlaria and parrots that are perching on it.

This is good 'audiobook' stitching since it's so repetitive. 

I also put in some time on the newly discovered needleturn applique block.  I got up to the tip of the second quadrant.  I really do enjoy applique, but finding yet another UFO was not fun.  I may do a paper-cuts quilt at some point.  Or it just may go into the Christmas Sampler with all the other odd and orphan red and green blocks. 

You can't really see it in the photo, but this one was done with freezer paper cut out, then ironed on.  Then the turn line was traced with a mechanical pencil for a narrow, accurate line and the freezer paper was removed.   Then the two layers were basted about a half inch in from the turn line (you can see the basting).  Cut a little, stitch, cut more.  Fun technique if you like handwork as much as I do. 

On the knitting front, got to the second corner of round 8 on the sock yarn blanket.   I'll do that corner while I catch up with the rest of the SSS crew (link to current round up).

ETA:  Kathy asked us about our favorite hoop in the link up.  Mine are the Hardwicke Manor embroidery hoops (from Access Commodities).  I have three: one is 5/8 inch deep and 6 inches across.  The others are 5/16 inch deep;  6 and 4 inches across.  All are from Threadneedle Street in Washington state.  Link to these hoops on their website.

Here's the littlest hoop on the cutwork napkin a while back.  They are very nicely finished with the adjustment screw being a heavy brass and the thumbscrew has a slot to really tighten down with a small screwdriver.  


Saturday, October 24, 2020

Multi-generational UFO: The cutwork table linens

Back when I first introduced the inherited bits of "Aunt Lottie's Garden" (the green and lavender hexagon sets), I alluded to the fact that when my mother passed away, I inherited all the unfinished projects and all the materials stashes from my mother and father (and anything THEY had inherited that they hadn't used).  Mom was a primarily a knitter, though she did some embroidery, and dad was a weaver and machine knitter and stained glass artist.   My sister is a professional artist, but her mediums of choice are wall murals and stained glass (she inherited all of those supplies), not fiber of any kind.   She technically knows how to weave but once she did her required studio pieces, I don't think she has touched a loom since.  Likewise, I know the theory of glass and finished a single project, but it's not my thing.

I have used up most of the inherited yarn in afghans and charity knitting, and the hexagon sets you have seen as "Aunt Lottie's Garden" has progressed, so there are only a couple of projects left unfinished from my mom.  

This is a set of eight linen napkins, a card table sized table cloth and a larger tablecloth. The technique is a type of whitework/cutwork.   The basic idea of free embroidery cutwork is that you work a 'frame' of very tightly worked buttonhole stitch or blanket stitch around the edges of the area that will be removed, then carefully (oh so very carefully) cut out, leaving the frame supported by the uncut threads beneath.  Some types of cutwork embellish the open areas further with needlewoven bars and picots.

This set uses blanket stitch worked very close for the framing stitches, padded with a soft cotton in running stitch.  There are small details in stem stitch and French knots.  It is not true whitework (which is white threads on a white base fabric);  the linen here is unbleached and the work is being done in DMC #8 Perle Cotton (Color  613 - a pale greenish khaki color).   And OMG, this linen.   It's dense, and rustic and impossibly luxurious.  I believe that she  purchased the napkins and the smaller tablecloth right around WWII.   There is a definite 'Arts and Crafts' feel to the item numbers stamped in the selvages.


Maybe these were for her 'hope chest'.   She was in high school during the Depression and at teacher's college during the war years. 
Mom's HS yearbook picture: age 16


The larger tablecloth is not stamped; instead it has the motifs sketched on by hand.    The motifs seem to be traced from the smaller tablecloth and the linen is a slightly different color, though of an equal quality to the remainder of the set.   This leads me to think she bought yardage for the larger piece at a different time or from a different source.   Unfortunately, the size of the larger tablecloth does not match any table that I own or plan to own.  So I will repurpose that linen for other projects.   I'll only loose about six inches off each side as there is no center motif, only borders.

Luckily, the threads stayed with the project.   There's an entire box of 10 balls of the perle cotton, and some of the padding cotton (cotton floche or maybe candlewicking cotton - the label on that skein is long gone).

If she would have finished the napkins, I would have no issue tackling the smaller tablecloth.   But she finished six and a half napkins and now decades later, I will be trying to slot my stitches in next to hers and maintain the same look and hand.   Man, she stitched close.   Tiny, tiny stitches.......  

I'm not so worried about the actual cutwork part.   I did a 'dresser scarf' in this technique back in the 1970s.    This was actually a kit that Mom had given to HER mom (my Grandma Alice - sister of Lottie) as a gift and Grandma had never started it.   We were going through her boxed up things - pulling out kitchen gear for my first apartment and I snagged the kit.   It was actually a fairly fun stitch.   And I have MUCH better cutwork scissors now. 


The tablecloth will be a separate project down the line somewhere, as will a partially finished second dresser scarf in blue that compliments the pansy one above (thank you former me for keeping the threads with the project on that one, too!).  Looking at the finished one now, I should re-trim it closer.  I'll do that when I have the matching longer one done. There may even be a third dresser scarf/table runner floating around; I vaguely remember one with fruit - grapes maybe?
 
I am going to be adding a slot to my rotation for those items that are embroidery, but not counted thread.  I actually have two more old zombie WiP projects in addition to the pansy runner and the napkins that fall into this category.  Plus several unstarted projects: the card table cloth, Bateaux Bayeux, a lovely kit from Mary Corbet, a vintage German needlepoint kit that was a gift from my late mother in law, a tote bag, and some tea towels that I want to do.   All in crewel, stamped embroidery, painted needlepoint (counted canvas would go in the 'modern counted thread sampler' slot).  I will try a couple of rotations with five slots; I think it will be fine.  At one point I had ten projects in rotation (nine plus a finish/frame).   I won't go that high again - I would like to knit and quilt occasionally.

Thursday, February 13, 2020

Overwhelmed

I've been watching Flosstube videos (stitchers' videos on YouTube).  OMG, some of these ladies have hundreds of WiPs and they have competitions where they start one a day in May and December.  ACKKKKK.   30(ish) WiPs with only half a dozen being worked on is more that I can cope with!


While I've been finishing things, more new starts are getting finished than old projects.   I know that's because the old projects are BIG projects, and I AM making progress on the ones that I'm working on.   I need to remind myself that I am working, have a long commute most days and have limited stitching time.  I get the same panic feeling when people at the quilt guild get up every couple of months with another finished full sized or larger quilt.   I know most of them have a long arm quilter that does all their quilting, many of them are already retired, many of them have very large crafting budgets and household help.  


This blog does help.  But still such a long way to go..... (sigh). 

Sunday, December 8, 2019

Zombie Project into Needlework Rotation: Tissue Box Cover

Here's another "Zombie" project found in the basement.  I was supposed to be working on the Hexipuff Cushion this week, but found myself digging this out instead.  The leaflet is dated 1991 and some of the materials were purchased at our local Ben Franklin store (which closed in 1995 or 1996), so it was started somewhere in there.

The leaflet has patterns for a half dozen tissue box covers, each featuring a native North American songbird:  Oriole, Grosbeak, Jay, Cardinal, Meadowlark, Robin.   The last four are native to Kansas where I live or are common migratory visitors, so rather than make a boring box with just one bird, I am doing a different local bird on each side.  Interesting, this will also make something of a 'four seasons' display.  

Here are the finished sections:

Meadowlark (fall) and Cardinal (winter) plus the top.

Plastic Canvas is not my favorite needlepoint technique.  The yarns are acrylic and frequently snag on the base 'fabric', which tends to have sharp bits no matter how careful you were when you cut it out of the sheet.  However, I'm not sure why I stopped working on this one.  All the materials and the leaflet were packaged together in a ziplock bag; now all transferred to one of the clean ice cream tubs that I often use for project storage.

Since it was carefully stored, I assume I did intend to come back to this project.  Well, it's on the radar now, so it will get finished so I can use it on my desk at work.   I was short a few colors.  The yarns are Needloft Acrylic Craft Yarns and are still being made (no affiliation other than as a customer - good customer service and fast, too), though some of the color names are different than the pattern, which doesn't give an suggested thread or color number.   I made a cheat sheet with the pattern color name vs the manufacturer color name so I can keep them straight.

I have already started the third side, the North American Robin (spring).  See the Slow Sunday Stitching report in the next post for my progress this week.

Tuesday, August 27, 2019

FINISHED NEEDLEWORK: Zombie Hand Towel

Once I got started on this last Saturday, it went FAST.  Granted, it was one small motif, but still.....

 Both ends of the towel - old on the left, new on the right.   Probably close to 35 years between them.  I can see a difference in the shades - old DMC from the 1980s vs new DMC bought for this project.   But it's not right next to itself, so who cares.  

I didn't like the way the old back looked - very messy.  Old above, new below.   So I used a technique that I learned on a Drawn Thread class piece on reversible stitching - use a single strand of embroidery floss and go over each part of the stitch as many times as needed to make it as dense as the pattern calls for.  Yes, I stitched each leg of each X three times, and each of the back stitches twice. (I did the borders traditionally since they were not confetti.)  Doing this means that the ends are so much easier to bury and are only 1/3 as bulky.  You can also use an away knot to start and then finish by tying a tiny surgeons knot with the single strand ends and clip (but not too close).  Where you are working confetti stitching that is not full coverage or isolated stitches or anywhere else without a good place to bury ends,  it is a nice technique to use.

Totally nice and springy for my bathroom, which is cream and celery green with a "Mamie pink" tub. 

Thursday, August 15, 2019

Zombie Project - hand towel

Since the band sampler is on hold until my malachite beads get here, I pulled out another zombie project.   This will be a quick one, though not as quick as the Christmas hand towel that only needed one tiny motif to be done.

I'm not sure if this one qualifies as truly "vintage".   The chart book is copyright 1986.  And the colors are certainly mid 80s - peach and dusty pink and blues.   But I still kind of like it.   I got one end done and put it away.   WHY?   

The motif looks a little 'skimpy' when the towel is laid out flat, but is fine when it's folded in thirds to be hung up. There is an area of Aida banding on each end of the towel, so I'm just going to repeat the same motif on the un-started end and call it good.

Thursday, June 27, 2019

FINISHED QUILT: Christmas Cabin Stars Wall Quilt


I finished the little wall quilt:


Size:  approx. 18 x 22 inches
Machine pieced and Machine quilted.  
Fabrics from a bundle purchased in the mid 1990s from Overbrook Quilt Factory.  (Would be called a layer cake in today's terms, though these were 12 inch squares.) Top was found in a tub of 'to be quilted' items and it fit the challenge perfectly - stars made with only squares, rectangles, half or quarter square triangles.


As seen hanging in our guild challenge exhibit.   It's actually square, the photo was taken at an angle due to the way the quilts were hung


Sunday, June 23, 2019

Weekly update - June 23, 2019

Some crafting this week, including another block for Aunt Lottie's Garden


This is block #22 and I already have #23 basted to work on this week.   And I got two more bands on the VS Sampler "Earth" piece early in the week.  (See last two posts.)


My main focus, though, has been getting my little challenge quilt done.   It's an older UFO that just happened to meet the challenge criteria, so I'm motivated to get it finished.
It's about 18 x 22 (fat quarter sized) and I'm calling it "Christmas Cabin Stars"   I have the machine quilting done - very simple, just outlining the blocks.   And I'm in the process of binding it with a mottled green (also used as the backing).   


I have all the binding yardage made and the first side attached.  I'm not even bothering to do mitered corners.  I often use fold over square corners for mini quilts and table toppers.  They are quick and since the quilts won't be used, the fact that those types of corners aren't as sturdy and stable as continuous binding doesn't matter.

Saturday, January 5, 2019

BOM Challenge update

I totally didn't make my goal of keeping up with my Block of the Week progress and getting this quilt finished in 2018.  


For some reason, I fell out of love with this project in the second half of the year and this is all I accomplished from April to December


Block 16 - friendship block*
Block 17 - shooting star
Block 14 Redux - honey bee * with the applique finished
Block 18 - on the go*
Block 19 - board games*
And one part of the fill-in areas
I'm so disappointed with myself.   I have 6 blocks to do yet for this quilt and a ton of assembly for both the front and the pieced back.  I need to re-dedicate myself to getting this one done.  

Sunday, October 7, 2018

Slow Sunday Stitching - October 7, 2018

Home from needlework camp.   

Four projects, much fun and a finish!!

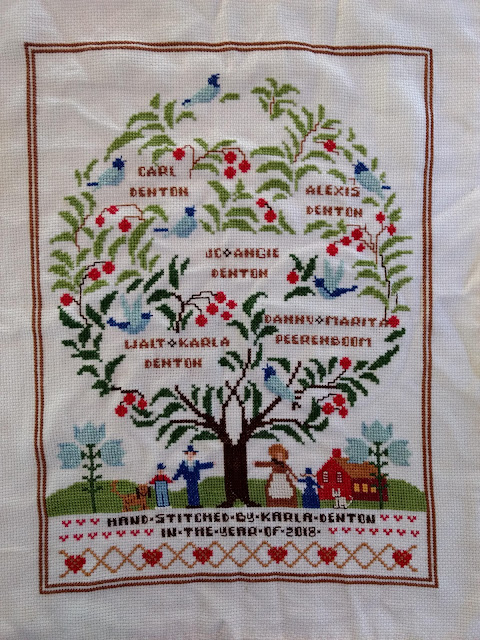
I got the 'Tree of Life" family tree sampler completed on the 'bring your own stitching' day.   I knew if I just buckled down to it, I could get it done.   I don't know if I am going to fill in the blank at the top with more leaves and cherries - they MIGHT have another child....... 

I didn't get any knitting time in on the socks - I still need to pick up the second gusset.  I may have a chance to do that after Bible Study tomorrow.

Right now, though, I am exhausted.   I will do some posts with the new needlework projects later this week.   Most (but not quite all) of the actual stitching is done,  but there will be lots of finished finishing coming up as NONE of that is completed.
Linking up (very late!!!) to Kathy's Blog for SSS.   There wasn't a lot of Sunday Stitching today, but there was a LOT of diving.  I'm so glad to be home.  

Friday, October 5, 2018

FINISHED NEEDLEWORK: Tree of Life

Took the "Zombie Project" to camp and got it done.   It just needs a good bath/press and then to be framed.  


This was a kit from the mid 1980s.  This is quite a nice Family Tree in a primitive 'Dutch' style.  Titled "Tree of Life", it was published in 1983 by Sunset Needlework and designed by Nancy Rossi.  The fabric is Aida 11 count, and the fibers are primarily perle cottons, with a bit of DMC floss for the details. 

Friday, September 14, 2018

Quilt WiP: "It was the 80s" - Block 18

This project has been on the back burner for several months.   Yard work, housework and other projects have taken priority in my life of late, but I do want to get this top to the LAQ by sometime this year, so I need to put some time in on it.  
The next block is another of the 12 x 12 inch blocks; it takes 16 half square triangles arranged in diamond and 'flying geese' units.  
  
I debated taking apart one or more of the old blocks that are on a 16 patch grid, but ended up making it from new cuts.

I was disappointed with my points on this block.   There's a lot of bulk in the seams and they didn't come together as nicely as I had hoped.

I think if I were to do an entire quilt with this block, that I would do oversized flying geese units with either 'stitch and flip' corners or paper piece them, which would eliminate half of the seams. 

The Solstice Quilt on Pat Sloan's blog with the blocks and layout.

Sunday, May 6, 2018

Slow Sunday Stitching - May 6, 2018

No finishes this week, but a fair bit of progress for it being a busy work week.  


First up, I got the EPP part of the panel for "It was the 80's" quilt done.   I still need to pull out the papers and get it appliqued down to background fabric so it can be inserted into the final top.   I think plain muslin or an off-white solid for the background.

The back - still have to remove all the papers before applique

And one of my pair of socks has a finished toe!   On to the second sock's toe.  


And last, but certainly not least, about an hour in on Dutch Beauty.   I got all of the buds on the vine along the right hand side completed, which is a page finish on Page N/14.   Probably the quickest page finish ever, though since they are only four or eight stitches each, there was a LOT of starting and ending threads in that section.    As I noted last week, the 'columbine vase' was done by one of my trade partners when this piece was out on a 'UFO Round Robin' a while back.

Also did the little motif in the upper right corner of page M/13.  And now I'm on to the right hand tulip, starting with the forcing vase.   It's so strange that I have seen bulb forcing vases in almost exactly that same shape in the garden shops recently.   Classic design!    Just barely started on that, so I'll show it next week when it's more than a 'blob'.
Please swing by Kathy's blog and see what the other Slow Sunday Stitchers are up to.

Monday, April 16, 2018

Needlework Rotation: TW Y2K progress and Plum Street Scarecrow Introduction.

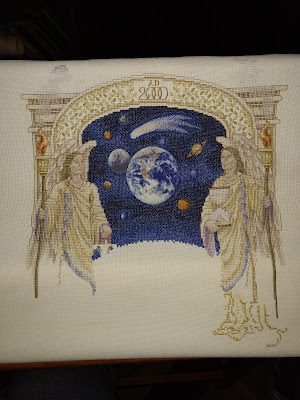
I have a solid ten hours in on Teresa Wentzler's "Millennium".    I got the rest of the over one on face of the right hand angel done, and all the back stitching (face, hair, upper wings, hands, hourglass, robe, torch) on that side done down to the page break.   Other than the beading and blending fiber that will be added at the end, the top half of this project is completed.

Here's where I started:


And here's where I am now.   In addition to finishing up on page 2, I started to establish some of the lower robes on the right side.  

When this project comes back up in rotation, I'll do the same on the left hand side.   There are at least a dozen blended shades each in the upper robes, the under tunic and also in the lower wings, so it will be a while on those two sections.  

In general, I think I'll work from both sides in toward the middle on page 3 and 4.  There's a landscape section in between the two angels and then a bottom frame similar to the upper arch with foliage sections and a verse in over one and backstitch.   Still a very long way to go on this piece.

The next slot in the rotation is my slot for modern samplers and smalls.   I still have one project from last fall's Silver Needle camp.   So I picked that one from my list of 'possiblities'.  The designer is Plum Street Samplers; and we are again extracting a section of a larger chart to make a small décor piece.   This one will be finished as a 'open ended triangle' and will use the scarecrow, fence and corn rows from the bottom right side of the "Cinnamon Stars" chart.

Nice 'autumn' pallet on this one.  Looking forward to starting it this week.

Wednesday, April 11, 2018

Quilt WiP: "It was the 80s" - Block 17

This is a 12 x 12 block.   I still have a bunch of 12 inch (finished) blocks from the old quilt, so even though I really like Pat's block with it's 'birds in the air' and 'hourglass' units, I'm going to sub in this Shooting Star block.  
sub for Block 17

The remaining blocks actually have almost a half dozen 'stars' with potential to go into the top; the rest will find a place on the pieced backing.   Most of them, though, have quite a bit of the bright rose solid that I'm trying to minimize in the top.  This one uses the bright rose print and one of the 'Bonnie Hunter neutrals' that hasn't seen much use.   I'm trying to use the 'minor fabrics' at lease three places in the top so that they don't look quite as much like an afterthought.

Star blocks are a theme in this quilt, which is one of the things that drew me to the design and layout.   Since the original quilt class was a gift from my late husband and with Walt being an amateur astronomer, stars are so appropriate.  Other star blocks so far: Block 2 - night into day star*, Block 15 - precious fabric* and there are a couple more to come.

Side note:  This week's 'basement box' yielded the notebooks from the original class.   The self-published paperback "Your First Quilt...and More" by Virginia Robertson was the main book for the class.   A glimpse of it above.

The Solstice Quilt on Pat Sloan's blog with the blocks and layout.

Tuesday, April 10, 2018

Quilt WiP: " It was the 80s" - Block 16

Pat's next block is called "Friendship Block".   There are a ton of quilt blocks with that name, but this one actually reminds me a bit of "Card Trick", though it's much simpler to put together.   I salvaged part of another of the dark 9 patches for one of the fabrics in this block.


The 9 patches are only four and a half inches cut (four inches finished), and I needed five inches cut, so I pieced the larger unit.   But if I had just added on the half inch, that would have meant that the 'extension' seam and the 'actual' seam would be practically on top of each other.   So I moved the extension seam up to 1.75 inches from the bottom of the piece.   I chose that distance because that is the width of the side piece with one seam sewn.    Hopefully that will make the 'extension' seam less obtrusive.   Of course, with fabric this busy, your eye doesn't see the seams anyhow.   But I'm fussy that way.  LOL.   12 x 12 inch finished block; though the grid is not immediately apparent, it's actually a 16 patch.

I didn't, by the way, piece the medium blue.   I wanted to preserve as much of that print as possible.  It's an interesting large scale tone on tone 'cabbage rose'.  I wish I had enough to fussy cut a bit, but I'm already down to just about a fat quarter with another 9 blocks and a bunch of sashing to go.
Block 16


The Solstice Quilt on Pat Sloan's blog with the blocks and layout.


Saturday, April 7, 2018

BOM Challenge Update - March 2018


It's the first Saturday of the month, so that means it is time to check in with the link party on Jo's Country Junction for the folks that are working along on their Sampler/Block of the Month/Block of the Week UFOs.  


Work was a bit busy over the last month, so I only got one block a week done.   And one of them isn't finished.   That "Floating 9 patch" in the center top of the photo will actually become a "Honeybee" block after I get some applique on it.   On the other hand, made good progress on the total area since there are two of the larger blocks in the layout in this batch.


This is basically the half-way point.  My goal is to finish this quilt all the way to the binding this year.  Considering that I'm going to piece the back (I will get RID of those rose fabrics!!), I'd like to have it to the LAQ by Labor Day.    I think that's do-able as long as I keep the pace.  


The details on the blocks:
Block 12  - Jacob's ladder*
Block 13 - studio time*
Block 14 - honey bee* (incomplete in this picture - need to add applique)
Block 15 - precious fabric*
Pattern is Pat Sloan's "Solstice" with the starred blocks and the layout from her pattern.  Un-starred blocks are from the original quilt top and will be substituted for Pat's blocks in the final layout.

Friday, April 6, 2018

Quilt WiP: "It was the 80s" - Block 15

There are several blocks in the new layout that I'm a little unsure about.   This is one of them.   It's one of the larger blocks at 20 x 20 inches finished.   It's a huge pinwheel meant to showcase a 'favorite' fabric.  


The problem is that it's going to be an expansion and re-work of this block from the old quilt.


Oh, yuck, that rose solid.   I don't have any more of that blue, but one of the new blues  will hopefully work with it.   I have tons of the rose, but don't really want to use it for the expansion as I am trying to minimize that color in this quilt top.  I keep telling myself that if I hate it in the final layout, I can always take it all apart and re-make it with the soft rose.  And the neutral border will tone it down some, too.  I hope.
It's going to also be rather nerve wracking to cut this down from 12.5 to 10.5 inches square.  I have one shot. 
Later: 
Block 15
Not too shabby.  But there were a couple of challenges. I ended up having to take the pinwheel apart back to the four quadrants to avoid having to do a set in seam, but that also let me trim everything up a LOT more accurately.  I also discovered that my new purchase of neutral, though the same print, is quite a bit more ecru than my original purchase.  It wasn't noticible in the store; I was more concerned about matching the print.  But once I got it under the daylight bulb in my sewing area, it was obvious.  I ended up having to re-do the half square triangles in the new neutral so that the cream was all the same in the block.   I'll just have to watch that as I go along.

The Solstice Quilt on Pat Sloan's blog with the blocks and layout.

Sunday, April 1, 2018

Quilt WiP: "It was the 80s" - Block 14

Pat does a traditional "Honey Bee" block for this one in her layout.   Finishing at 12 x 12, it brings in rounded shapes again, complementing the other applique and curved pieced areas.

I'm also using the opportunity to use one of the 'shirting' fabrics that I only have a fat quarter of. 

Once the block is pieced, there's three applique shapes on each corner - the 'body' and 'wings' of the bees.  I hope that the final block will look like four blue bees gathering around a central pink flower.  Right now, it looks like a floating nine patch LOL.

I will post the final block once the applique is done.   It's going to be my 'travel' work for a little bit.

The Solstice Quilt on Pat Sloan's blog with the blocks and layout.

Sunday, March 25, 2018

Slow Sunday Stitching - March 25, 2018

Determined to link up this week, since last week, there was a link fail!


First up, needlework: Teresa Wentzler's "Millennium" is the current rotation piece.
This is a close up of where I started.   Working on the left hand angel (Saint Raphael) down to the page break.  There were still a few colors of the over one stitching to fill in.
And at about 4 hours.   Over one completed.  This is the last of the over one other than the verse at the bottom of the piece.   But I'm done with the 'confetti' over one.   The face and hair are backstitched, as are the outer wings and torch down to the page break.  Just starting on the robes. 
It always amazes me how the backstitching makes everything come together.   There are multiple colors of back stitching on this piece, so even though the key is clear on what color is used for what shape, all the lines on the chart are monochrome, so I sometimes have to puzzle out exactly what colors go on what lines.   My basic rule is "what is 'in front' of what?".   For example: hair is in front of wings, so the edge between the hair and wing should be in hair color.  But the wing is in front of the column, so that edge needs to be in wing color.   
And here's a 'wide shot' to see the top half.  I've rolled up a bit now that I have the head and upper wing area completed.   Still quite a bit to do on the robes, hands, hourglass.  I may well be only doing backstitch for the rest of this rotation, but that's fine.   I'd love to have that page finish this time around. 
Better color balance this time.  Background fabric is ivory.
Second to report:  "Aunt Lottie's Garden" applique.   Block 10 is done.  The center of the top is now one third appliqued!


This project is going into a short hibernation.   I am also working on a sampler quilt ("It was the 80s") that is primarily machine pieced and will be sent to a local long arm quilter for quilting.   Since very little of it is hand sewn, I haven't mentioned it in a Slow Sunday Stitching report.   But there are a few bits that are hand work.   A traditional "Honeybee" block (which has quite a bit of applique) is next in the instructions and there will be a 6 x 18 inch fill-in area of English Paper Piecing.   So I'll be working on those parts for a while as my handwork project.  I hate to put the hexi applique away, but "80s" is actually my focus quilt, while "Aunt Lottie's Garden" is my travel project, so "80s" has priority.


My main focus today, though is to get the hanging sleeve finished on Sister's Choice and getting it labeled.  I'd really like to show it off at guild this week if possible.   I need to be a 'steady Sunday stitcher' as soon as I get back from church.   Speaking of which, I need to get moving or I'll be late. 


Linking up with Kathy at Slow Sunday Stitching (properly this week).